This Deceivingly Simple Digital Filing Method Is the Time-Saver I Need
You can set up the PARA method across all your platforms in 30 minutes flat

I recently wrote a post on my favourite apps and tools and noticed a lot of interest in my mention of the PARA method, the digital filing system I have been using for my personal and professional life.
Most people, myself included until a couple of months ago, don’t really have a filing system to speak of. Sure, I’d create folders and subfolders, but I wouldn’t put much thought into the structure.
For me, this made it hard to remember where I put certain documents and would often take me a long time to find what I am looking for (if I could find it at all). As we move more and more of our lives online, it’s a good idea to have some basic systems that make you (feel more) organized and efficient.
That’s where the PARA method comes in. It’s deceivingly simple, but that’s what makes it so powerful. And what’s even better — it’ll take you less than 30 minutes to set it up.
Let’s jump in.
What is PARA?
The PARA method was developed by Tiago Forte, a productivity expert and the founder of Building A Second Brain. He’s all about creating systems that will help you get the most out of your digital life. He believes that our focus should always be on creating output — not just hoarding information.
PARA stands for Projects, Areas, Resources, and Archive.
The idea is that you save each piece of digital information into one of these categories, using the same four-category filing system across all your platforms. This helps not only with deciding where to place information but, more importantly: where to find it again.
How is this different from regular folders and subfolders? The difference is that instead of organising according to standard categories, you’re organising in order of actionability — from most active (Projects) to least active (Archive). This creates focus and clarity on priorities, avoiding getting bogged down by endless folders that are not relevant at the moment.
I’ll go into some more detail for each category.
1- Projects
Projects are a series of tasks linked to a specific goal with a deadline. It’s a goal you have that will take less than 6 months to complete.
Examples would be planning a road trip, training for a marathon, hiring a new team member, applying for a new job, buying a car, completing an online course, etc.
Everything relevant to this particular project goes into the folder under Projects. This can be anything from meeting notes, presentations, invoices, templates, pictures, and so on.
All your active projects are grouped in the same folder, so you have good visibility of what’s on your plate and quick access to what is most relevant to you at that time.
Once you finish a project, the idea is that you go through all the content you have saved and transfer anything relevant for future projects to Areas or Resources. More on that below. Once that’s done, you move the finished project to Archive.
2- Areas
Areas are like Projects on steroids — they don’t have a start or end date, but they are active and important parts of your life that require continuous attention.
Examples of this would be Finances, Travel, Family, Writing, Health, etc. This will be different for everyone, depending on your life, goals and values.
You never complete Areas, but they can become irrelevant to your life. When that happens, move it to Archive as well.
3- Resources
Resources are topics or themes of ongoing interest. They are not immediately relevant to an active Project or Area in your life, but they are related to topics you are interested in and want to gather information on.
Examples here would be Architecture, SEO, Travel, Cooking, etc. Whenever you come across information you would like to save but is not directly linked to a Project or an Area; it can go into Resources.
The great thing about this is that the day you have a Project or Area related to a Resource, you immediately have a wealth of information and inspiration to tap into. No need to start from scratch.
This is also where you will store any information from your completed Projects that might be useful in the future.
4- Archive
This is where you store the inactive items from the three previous categories. All Projects that have been completed or cancelled, Areas that have become inactive and Resources that are no longer relevant.
When I first started using PARA, I actually moved all of my files straight to Archive. I thought it was a waste of time to go back through everything and retroactively implement the method, yet I wanted to make sure I kept it all somewhere safe, just in case.
Just move everything to Archive and start fresh.
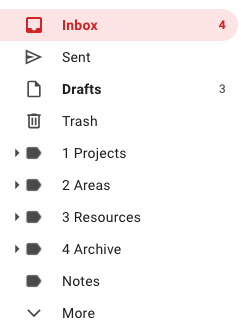
This is what it will look like
The power of the system becomes clear once you start implementing it consistently across all your tools. This means I have the same folders, with the same titles for all folders across my Gmail, Dropbox, Notion and Roam.
You can do this for any tool you have, regardless of which ones you are using.
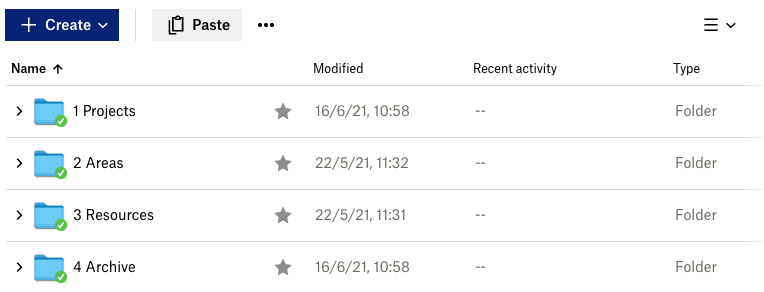
Dropbox
Notion
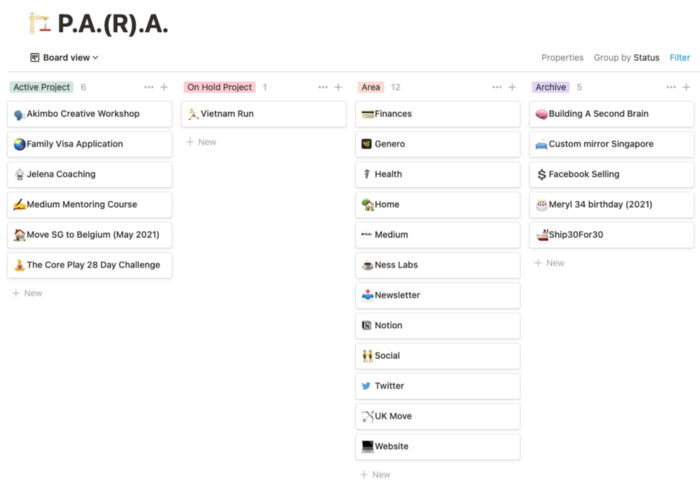
In Notion, I haven’t been using Resources just because I don’t use the platform for notes and inspiration. Instead, I’m only using it for Projects, Areas and Archive. Depending on the platform and what you use it for, you can customise the setup.
If you’re a beginner and interesting in learning more about what you can do with Notion, you can read more about how I use it here.
And done.
I can hear you thinking — that’s it?
Yup! As I said, it’s very straightforward, but I promise you that once you start implementing and using it, you’ll notice the difference in time and energy saved — not just when looking for things but more importantly when starting new projects.
PS: This piece was published in Forge on Medium - 15k views and counting!