How I use Roam and Notion for Personal Knowledge Management
A practical beginner’s guide
After my grandfather passed away, we got access to his computer and his files. We were amazed by what we found. We knew he liked to collect notes but had no idea how much he had gathered during the last years of his life. There were hundreds and hundreds of Word documents, filled with jokes, quotes and articles — in Dutch, English, French. A goldmine of information but without any structure and impossible to navigate.
He was clearly a note-taking nerd before that was even a thing, without access to any of the wonderful tools we have now.
It must be genetic because, in the last year, I have immersed myself in the world of Personal Knowledge Management (PKM), using Roam and Notion as my main tools. In the beginning, I was telling myself I needed to choose between the two. Most of the articles I found would compare Roam and Notion against each other. The way I read it— you’re either a Roam person or a Notion person. I couldn’t make a decision, so I decided to try out both.
After many hours of playing around, I have found a system that works well for me. In the spirit of publicly documenting my online writing journey, I will outline in this article why and how I use both Roam and Notion to store, retrieve and create content from a beginner’s point of view. This is not an in-depth guide or explanation of the features. This is purely meant to show you how I use the platforms and how you can use them too.
What’s all the fuss about PKM?
Let’s start with a bit of context around PKM and what it means to me. In the words of Tiago Forte, a leading productivity expert:
Personal Knowledge Management is the practice of capturing the ideas and insights we encounter in our daily life, whether from personal experience, from books and articles, or from our work, and cultivating them over time to produce more creative, higher quality work.
We live in extraordinary times, with direct access to a never-ending flow of information and knowledge. To really thrive in this Information Age, we need systems to manage this flow, absorb the relevant information and apply it to our lives and careers.
To me, Personal Knowledge covers a wide range of information ranging from book highlights, personal data and anecdotes, meeting notes, birthdays, gift ideas, receipts, travel details, inspirational quotes, personal goals, and so on. Anything that I want to remember and that might be useful to me (or someone else) in the future. By storing all this stuff in a centralized and digital place outside of my forgetful brain, I can rely on the benefits of searchability, backups, syncing between devices and sharing with others.
There’s no real end goal here. For me, it’s about having systems that make me as organised, proactive and creative as possible.
Notion
Notion calls itself the all-in-one workspace for your notes, tasks, wikis and databases. It’s one of the most popular note-taking tools on the market, ideal for creating productivity-focused workflows and storing information in a very structured and hierarchical manner.
There are a million ways that you can use Notion, and in the beginning, it can feel slightly overwhelming. Compared to many other articles and videos out there, you will see that my setups are quite basic. That is because I’m still a newbie in this space, but also because I prefer to keep things easy and manageable, needing minimal time and energy to maintain and update. I don’t want to spend hours designing new pages as that defeats the whole purpose of efficiency (productivity porn is a real thing!).
Here is how I mostly use Notion.
Task and Project Management
I use a light version of the productivity system Getting Things Done by David Allen. The idea is that you dump all your mental clutter into an external system and then organise it so you can focus on the right things at the right times. By keeping every single thing in your head, especially small admin tasks (payments, calls, errands), you become stressed by trying to remember everything and worrying about what you’ve forgotten. Having a system you can trust alleviates the burden of trying to remember it all.
For this, I started using Thomas Frank’s template. You can watch a tutorial on how to use it here or watch this if you prefer to build your own. It’s a super detailed template with everything you could need for your task and project management.
I simplified it quite a bit to make it work for me but kept the key elements:
- Inbox: here, I add every task that pops up in my head — no matter how small. I can immediately assign a date, or I can leave it in the inbox so I don’t forget and assign a date at a later point. I can set one-time or recurring tasks and set priority levels.
- Today: This is the last page I open in the evening to see what I need to do the following day. I try to be as realistic as possible, and whatever I don’t feel like I can get done or need more time for, I reschedule to another date.
- Next 7 Days: I look at this view a couple of times a week to have a sense of what is coming up and to rearrange dates as necessary.

You’ll see there is a column called Project/Area. My files are organised using the P.A.R.A. method, a digital filing method developed by leading productivity expert Tiago Forte. It stands for Projects, Areas, Resources and Archive.

You can fall into bottomless Internet rabbit holes reading about this, but again, I want to keep it very simple. In Notion, I only use P.A.A.:
- Project (active or on hold): these are projects with a specific objective and have a clear start and end date.
- Area: important areas without an end goal; areas of responsibility in my life; categories to organise documents.
- Archive: finished projects or areas that are no longer active or relevant.
When a task falls under a specific Project or Area, I assign it accordingly. Then, any information that is relevant to remember, I add to the Project or Area page. This can be information about doctors’ appointments (Health), furniture measurements (Home), investments details (Finances), etc. The aim is to store the information that can be relevant in the future in a way that is logical and easy to retrieve.
Now, I can hear the sceptics thinking: “Isn’t all this tracking and organising a colossal waste of time? Just do the things you need to do and done!” (Also, my mom’s reaction when I proudly showed her my Notion pages.)
If that works for you, that’s great, but I have found that doing this has helped me be more organised and proactive about the things I need to do. I don’t get blind-sighted by deadlines. I’ve also gotten rid of that nagging feeling that keeps popping up when you are trying very hard not to forget something. That mental freedom has been great.
Content Management
The main goal of all this collecting and storing of notes should be to have a wealth of content at your fingertips for creating whatever it is that you want to create. In my case, that would be writing articles.
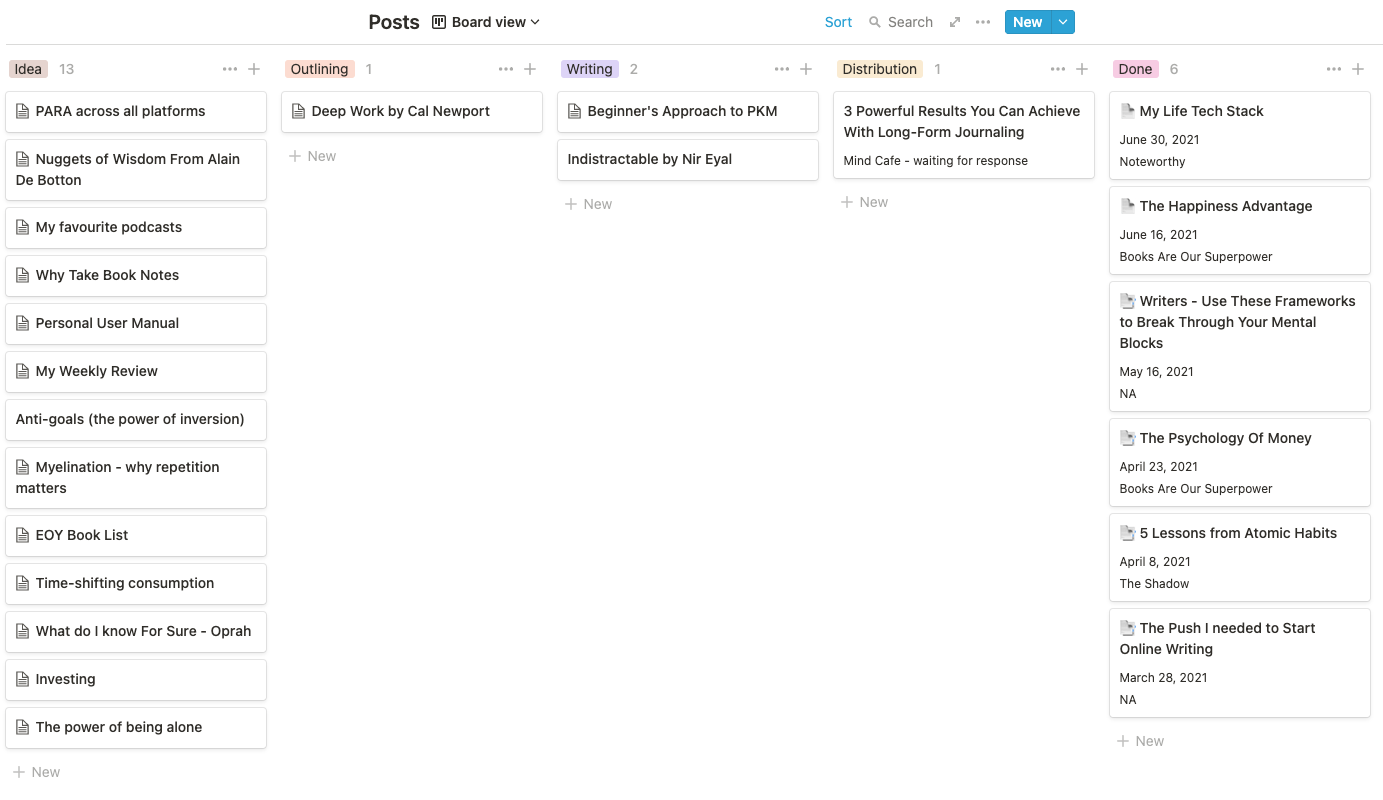
I don’t do the actual writing in Notion, but I like to use the databases to keep track of the ideas and articles. The great thing about databases in Notion is that you can view them in different ways depending on your preference— lists, tables (like the Tasks screenshot), boards (like the P.A.A. screenshot) or kanban boards, like my Content Tracker.
Whenever I think of a topic that I would like to write about, I add it to the Idea column and include any initial thoughts or resources that will be useful. I also have columns for posts that are in the Outlining, Writing or Distribution phase. Finally, once I’ve finished a post, I’ll add any details that I want to remember to the page (like date of posting, # of hours spent on writing, published in a publication or no, etc.) and move it to the Done column.
I’m at the very early stages of my Medium career (you’re looking at article #7, woohoo!), so we’ll see if this system will need to change as time goes on.
Roam Research
Roam is like the new cool kid on the block. They have only been around since 2019, but they have rapidly amassed a large following of passionate and dedicated users. Roam describes itself as a ‘notes tool designed for networked thought’.
Roam can seem quite intimidating at the start. I took a course for beginners, and from there, I was sold. Compared to Notion, the interface looks very simple. You don’t have all the fancy design options, no emojis. To me, that’s what makes it perfect for learning and writing.
Here’s how I use it:
Notes Capture
The human brain is non-linear: we jump from idea to idea, all the time. Your second brain should work the same.
This is taken from Obsidian’s website, a competitor note-taking app, but it perfectly describes why I prefer keeping text notes and highlights in Roam versus Notion. I don’t want to worry about folder structure or hierarchy, as that’s not how our brain works.
Unlike Notion, Roam has a flat structure, with each page living separately from one another. You can reference or link to any other page by adding bi-directional links and tags. One of the main benefits to Roam is how quick and easy it is to create new pages as you’re writing, just by using the “[[]]” command. For example, if I wanted to build a page called “Medium” I would type [[Medium]], and a page would be automatically built. This is very different from Notion, where you need to think about where to create the page — like a hierarchy.
Like with Notion, you can make things as simple or as complex as you need. I mostly use the Daily Notes page. That’s a page that gets created automatically every day, with today’s date. You can’t change or delete this. Throughout the day, if I come across notes or quotes or anecdotes that I’d like to keep, I add them to the Daily Notes page and add links and tags where necessary.
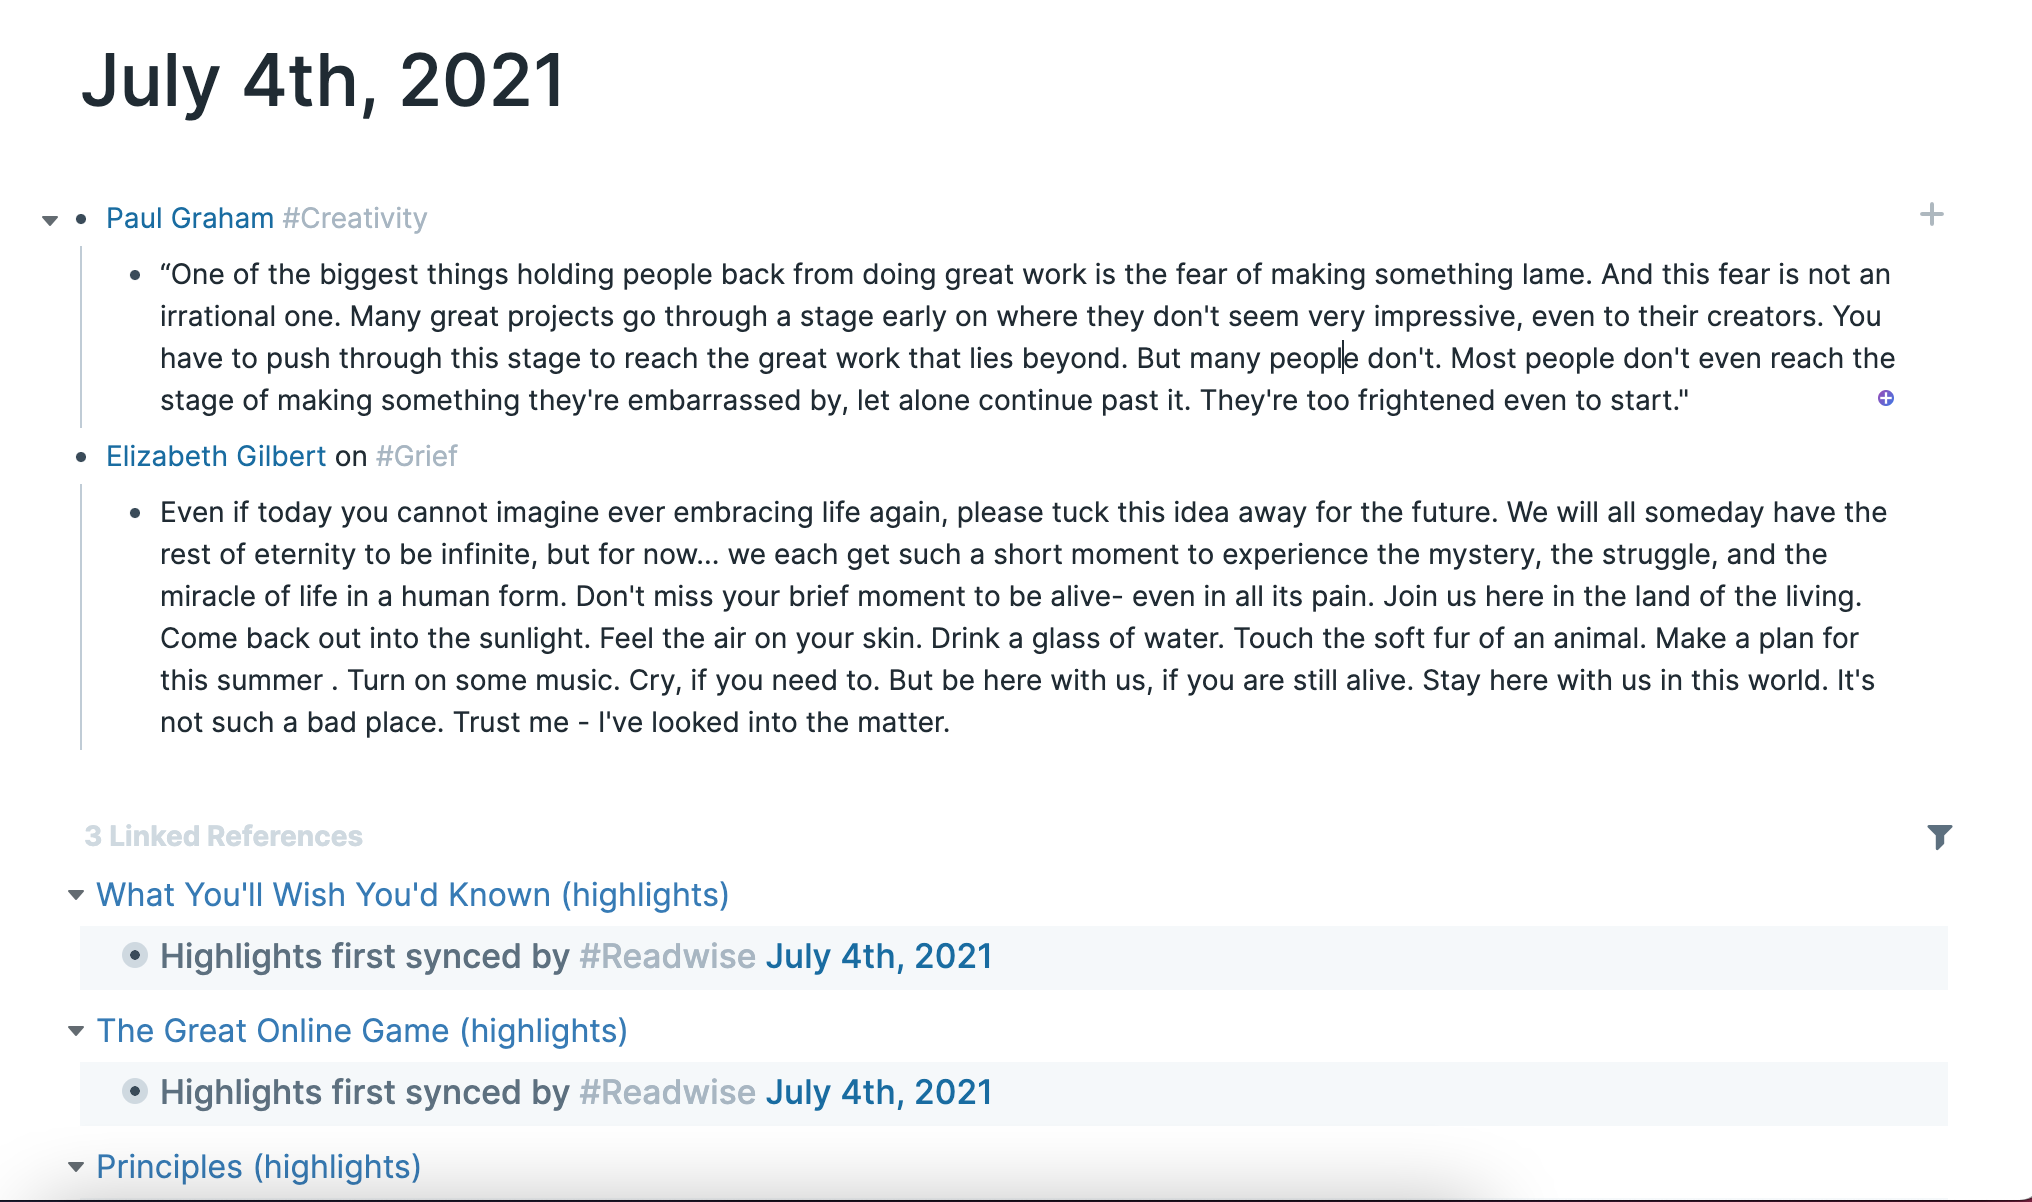
You’ll also see that there are Linked References. These are my books (using Kindle) and online content (using Instapaper) highlights that automatically get imported by Readwise. Readwise is one of my favourite apps with many great features to help in the creative writing process, which I’ll write a separate post on soon.
Here’s a quick snapshot of my capture toolkit:
- Book highlights: Kindle → Readwise → Roam
- Online content highlights: Instapaper → Readwise → Roam
- Newsletters / Emails highlights: Email to Instapaper → Readwise → Roam
- My own notes, ideas, thoughts: Directly into Roam (Daily Notes)
Every couple of weeks, I go through the Readwise highlights that have been imported into Roam. The intention is to engage with my notes as much as possible through tagging and notes design. By notes design, I mean compressing, adding my own thoughts and takeaways, bolding, and removing anything repetitive/unnecessary. Just collecting and never looking at the notes again wouldn’t be useful, and the more you intentionally link your notes together, the more valuable your web of ideas becomes.
Outline Writing
I’m still figuring out my ideal workflow for writing new posts, but so far, I have been using Roam to create the high-level outline in bullet points format. I’ll first go through my notes, searching appropriate tags to collect pieces of content. I think you can already see where I’m going with this. Without a system like Roam, it would take me forever to look for relevant notes and resources. I’d have to start from scratch every time.
Once I start writing, I switch to another tool simply because I find the block structure of Roam too distracting for an article.
Long-form journaling
I like to do long-form journaling in an app called Bear, but I’ll transfer my writing to Roam every week. I do this because I can easily create a page for every person and location mentioned in my entries in Roam. Then, when I go to that page, I can see every time I mentioned this person or location. Again, using technology to keep track of conversations and experiences that otherwise would get lost in the abyss of my mind.
Final Notes
📆 Use Notion for building productivity and project management systems, as well as storing documents and digital data.
✍️ Use Roam for capturing and organising notes and as a thinking/creativity tool.
❌ Don’t try to look for the perfect system from the beginning. Play around, see what works best for what you need and figure it out as you go. The more you use it, the more you will see what works and what doesn’t.